


I'm not pretending to be a professional photographer or anything but since I still don't have any new cards that I can share yet I thought I'd share quickly on how I take photos of my cards.
There are a few places that people seem to go wrong, and if you look back at my older cards you'll notice I made the same mistakes and someone told me how to fix them, so I thought I'd pass it on. Backgrounds
Noone wants to look at pictures of your messy desk (unless there's new catalogue spoilers etc to be seen in the background lol) so I always try to find somewhere clean but plain to take a photo, some people have a nice bookcase etc to give a clean background without distracting from the card. Clear, dust free surfaces are hard to find in a house with a toddler who trashes things and a husband that "doesn't know" (ha! likely story...) where anything lives, so I go for the lightbox approach. Lightboxes are really expensive but you can get the same look without spending a cent.
In the photo above you can see my "light box" I use 2 backing sheets from DSP Packs and prop them up like you can see in the pic, 1 for the base and 1 for the background. If I'm doing a layout I put the 2 sheets side by side for the background and use a clean piece of grid paper for the base. I have also seen people use a coordinating sheet of DSP as the background which looks fantastic as well.
Some people use daylight or OTT lamps to get the colours right, but I find with a few photoshop tricks you don't necessarily need one - more on that later.
Camera Settings
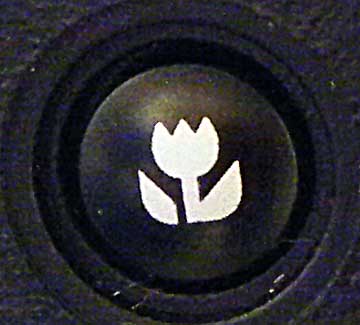
I set the camera on Macro, most entry level point and shoot digital camera's have a macro setting these days (in case you aren't sure which button it is, here is a photo, they look similar on all camera brands). If you use the macro settings you are telling the camera that you are trying to take a close photo with lots of detail so the camera focuses better and seems to pick up a lot more of the detail. It also seems to not make the flash as harsh (at least on my camera), not really sure on the technicalities but i can take a photo with the flash and totally wash it out, then switch to macro and from the same distance have the colours and detail come out perfectly.
Also, don't be afraid to back off and get more background in the frame than what you want, you can easily crop it out later.
Photoshop
Using the flash will affect the colours slightly even with the macro setting, I have a hand-me-down copy of photoshop CS2 that I use but most photo editing software would have similar options. Anyway my trick (about the only thing I know how to do apart from crop a photo) is to go into the Image menue... Adjustments... Auto Levels, then Auto Contrast and Auto Colour. Sometimes you might need to undo and leave out 1 of the steps but I find that these 3 normally make a huge improvement to the colour of my photo's.
If you don't have access to photoshop or similar you may find that you need to position your "lightbox" in sunlight to get enough natural light to go without the flash.
Images © Stampin' Up!, Designs © Zarna Gould
19 May 2009
Card Photography
![]()
![]()
Subscribe to:
Post Comments (Atom)


1 comment:
Thanks Zarna, I to use photoshop Cs2 and didn't know about the auto level's and like so thank you so much!
Steph X
Post a Comment