Showing posts with label 3D Item. Show all posts

06 October 2011

Beautiful Butterflies in 3D

The other month I held a 3D class as my regular Stampin' Up! class. We also made a Snow Globe card but I'll show you guys that one closer to Christmas.
The other 2 projects we made were a pop up card and a matching gift box using the Fancy Favour Bigz XL die.

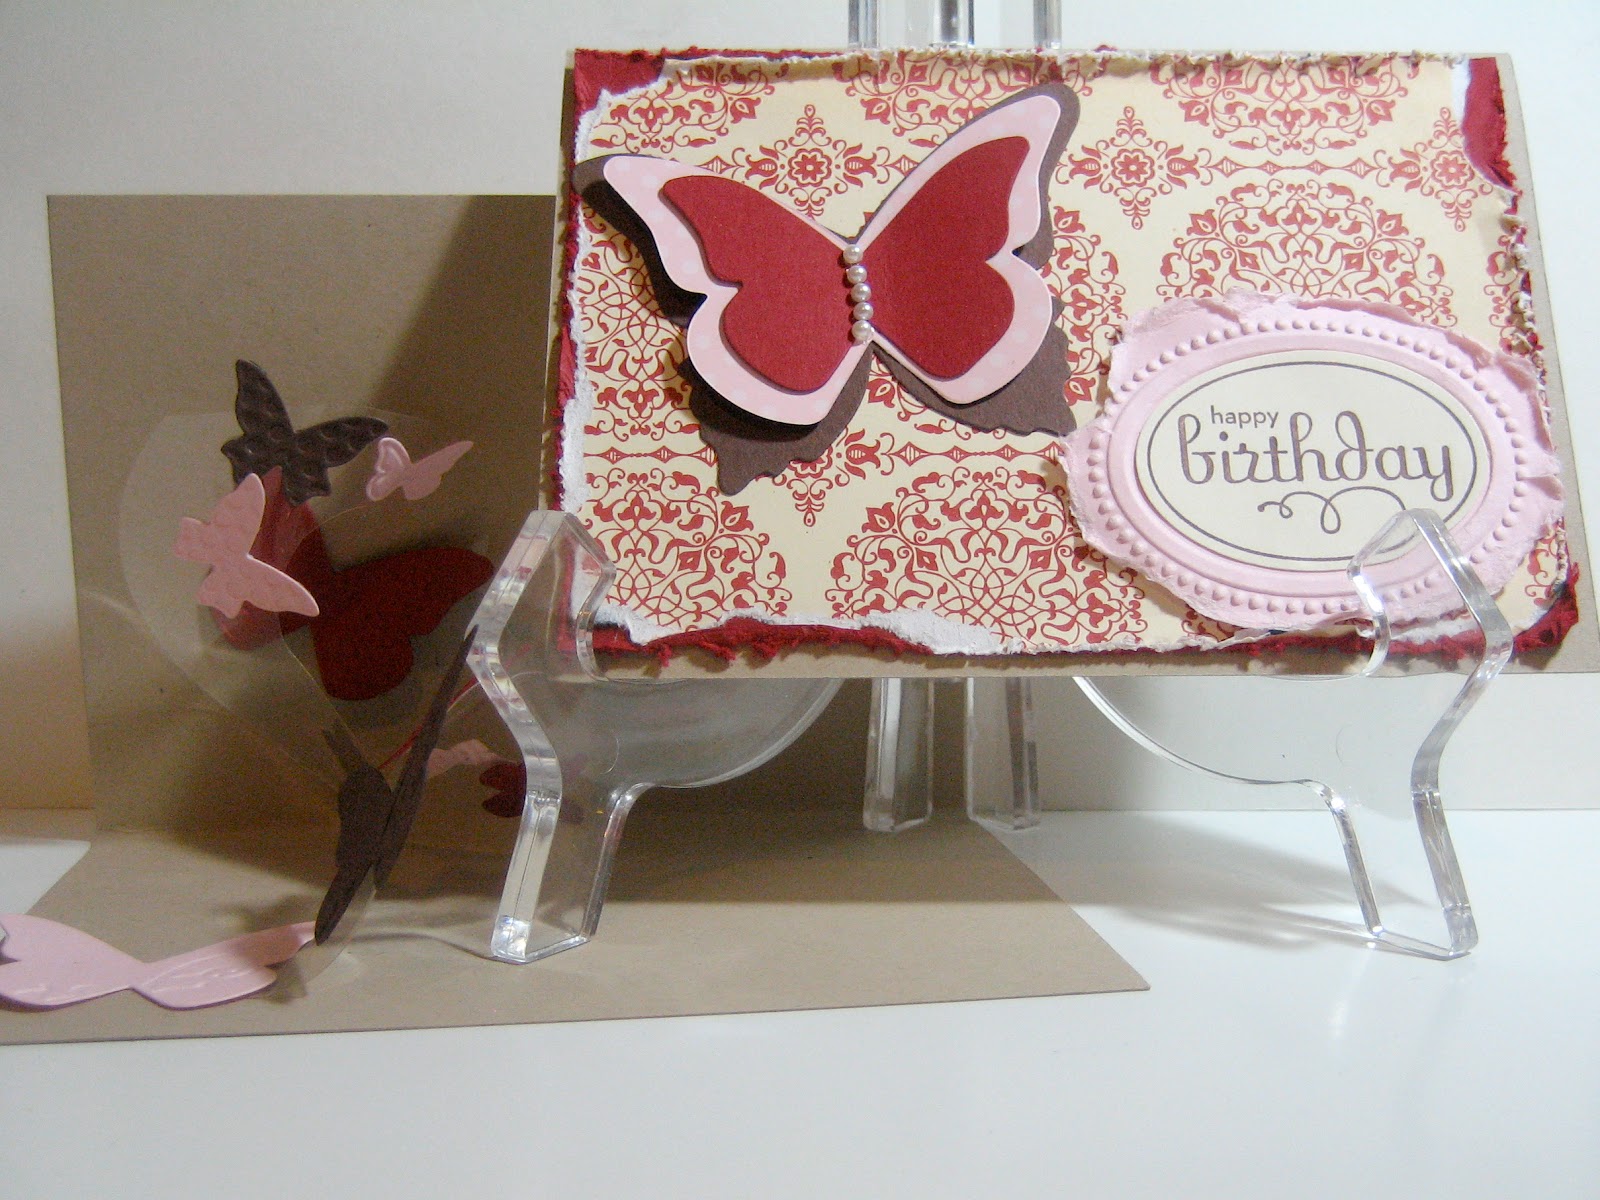
 Here is the card we made, inside and out, we used some window sheets to cut a spiral so that the embosslit butterflies seem to fly off the page.
And the matching box, isn't this so cute?? Perfect size for popping some home made yummies or a bit of jewellery inside.


Stamps: Perfect Punches
Ink: Chocolate Chip
Cardstock: Love Letter DSP (retired), Crumbcake, Cherry Cobbler, Pink Pirouette, Very Vanilla, Chocolate Chip
Accessories: Window Sheets, Basic Jewels Pearls

Punches: Wide Oval, Butterfly
Bigshot: Fancy Favour Bigz XL, Beautiful Butterflies Bigz, Beautiful Wings Embosslits, Designer Frames Textured Impressions
Tools: Circle Scissor Plus


Images © Stampin' Up!, Designs © Zarna Gould

12 August 2011

Stampin' Up!'s new (to us!) Designer Fabric

 I've been having heaps of fun playing around with my preorder from the new Stampin' Up! catalogue that will be out in September. Especially the new Designer fabric! I made a little memory board to display my card samples when I am out and about, I used a 12x12" frame that I already had (It used to house this piece of wall art). I used a piece of DSP backing cardboard for my base, layered some quilt batting that I had left over from Asher's Quilt. Glued it all down at the back using Tombow and then criss-crossed the Satin Ribbon across the front, stuck them down at the back with sticky strip. I poked some vintage brads through all the layers - this was the trickiest part, even though I used the Paper Piercer the fabric & ribbon sort of sprung back into place and the brad prongs wanted to bend a little, but I got them through with a bit of wiggling. I backed it all with another piece of DSP backing card glued down with more tombow. Popped it in the frame & I was done.
It took about half an hour to complete including the time spent wrangling the children out from under my elbows, so easy!

Another project I made, again simple but not as quick, this time a little shirt for Charlotte (inspired by this pin on pinterest), she is a slim size 4 and the long edge of the Designer fabric wraps all the way around her with an inch or 2 to spare, I think this would make a beautiful newborn baby dress! I completed this in 1 and a bit days, if I'd had a more cooperative "mannequin" I would have finished sooner lol


Fabric: Flirtatious Designer Fabric
Accessories: Rich Razzleberry Satin Ribbon, Vintage Designer Brads

Images © Stampin' Up!, Designs © Zarna Gould

27 April 2011

Baby Shower for Carmen

My sister-in-law had her little boy Asher (proud Aunty post to come next time, I've got to give the card & gift to her before I can post it here)
One of the girls from work threw a baby shower for my sister-in-law Carmen but our mother-in-law and Nana-in-law couldn't make it so I threw another one for everyone who couldn't come to the first one, of course I couldn't help adding a bit of SU! style to the decorations!
A banner made with SU! products, I didn't use the pendant die because I didn't have it but after handmaking each of these little flags I'm really wishing I did have it!
I had to keep a gender neutral theme for the decorations which was hard because even though I knew that he was a boy there were people who didn't want to know what she was having. I think I went a bit overboard with pink trying to compensate for knowing he was a boy lol!
Close up of the banner, I used the Bigz alphabet dies (name escapes me right now) covered in a little crystal effects for some shine.
This little journal idea I stole from a friend who saw it at a baby shower she went to. It's a little journal of mummy tips & childhood stories for the mother to be, I covered a 5x5" On Board art journal with some Lap of Luxury DSP.
Close up of the ribbon covered spine, I had fun with this one, can you tell? ;p
I added a little tab for each category & her name using the Timeless Type Jnr Sizzlits dies.

Images © Stampin' Up!, Designs © Zarna Gould

08 October 2010

Convention Make & Take pt 1

As you know I went to SU!'s convention in Sydney earlier this year, (so much fun! I wish I could go next year to Melbourne but at this stage it doesn't look likely) included in our registration was a little make & take kit including 2 stamp sets, a pack of rubons and all the cardstock and embellishments to make 4 projects during the Make & Take session. Due to SU! rules we aren't allowed to show new products until the preorder period starts so I didn't show these projects at the time, and then I forgot about them with all the excitement of a new catalogue, but I found them while I was editing photo's and I thought I better post them before I forget again.
This is a little favour box made using the Fancy Favour Bigz die (which was pre-cut in our packet so we didn't have to stand in line for hours while hundreds of demonstrators cut their boxes thank goodness!) and the cute little Bday party rub-ons. To make sure this little cutie wasn't damaged in my luggage I prepared all the individual pieces and then assembled it the day after I got home, since I was home with all of my stuff I couldn't resist cutting up a few strips of Old Olive Cardstock and running them through my crimper for the finishing touch.

Stamps: Printed Petals
Ink: Melon Mambo
Cardstock: Bashful Blue, Old Olive, Whisper White
Bigshot: Fancy Favour Bigz XL
Accessories: 1 1/4" Striped Old Olive Grosgrain,Crimper, Bday Party Rubons, Clear Rhinestone Brad 

Images © Stampin' Up!, Designs © Zarna Gould

10 June 2010

Picture frame whiteboard


We had my monthly get together the other weekend and we made these cute whiteboards. Everyone had a different paper set so they all took home something unique. We used the Timeless Type Jnr Sizzlits alphabet (loving them sick!)
ETA: Whoops, meant to schedule this one, means you got 2 for 1 today :)
Cardstock: Good Morning Sunshine DSP, Kiwi Kiss, Summer Sun
Accessories: Chocolate Chip 5/8" Grosgrain

Punch: Scallop Border
Bigshot: Timeless Type Jnr Sizzlits 

Images © Stampin' Up!, Designs © Zarna Gould

25 March 2010

I wanted a housewarming gift for friends, so I bought a bottle of cleanskin pink sparkling wine (the bottles have a really small label and no other markings, so they are perfect to alter) and made this band for the bottle. I designed it so it slips off so when they chill it the bottle the label won't go all soggy.
I used a scallop circle punch for the flower and the small heart punch for the handmade button. I used sparkle for the sentiment because I just couldn't help myself :)
Stamps: Warm Words
Ink: Rich Razzleberry
Cardstock: Cottage Wall DSP, Pale Plum, Old Olive
Accessories:Crystal Effects, Linen Thread

Punches: Small Heart
Bigshot: Little Leaves Sizzlit, Lots of Tags Sizzlit

Images © Stampin' Up!, Designs © Zarna Gould

22 January 2010

Teacher Gifts Part 4

One last set. This one was for Miss Kerrie (I know yesterday's was for Miss Kerry too but that was Miss Kerry with a "Y" and this is for Miss Kerrie with an "IE" I think the centre has about 4 Miss Kerrie/Kerry's lol).

This first design uses a jumbo grommet. I threaded the ribbon through the grommet before sticking the grommet down then tied the knot in the centre.
For this set I left the box detail fairly simple since the DSP pattern was so nice I figured I may as well let it be it's own feature. The 1st photo shows better how the label on the front is nice and wavy. I just bent it before using glue dots to stick it on the box.
Another simple card. I love how this stamp from "Best Yet" looks so good in a layered scallop circle, I'll be sad to see the set go when the new catalogue is released later this year. (Ok, who am I kidding? I'll be so excited over new product I'll find something else to love... I'm such a fickle stamper lol)
Stamps: Best Yet, A Rose is A Rose
Ink: Not Quite Navy, Kiwi Kiss
Cardstock: Not Quite Navy, Kiwi Kiss, Baja Blue, Whisper White
Accessories: Baja Breeze Striped 5/8" Grosgrain, Jumbo Grommets, Button Bouquet Designer Buttons
Punches: Scallop Edge Punch, 1 1/4", 1 3/8" and Scallop Circle Punches

Images © Stampin' Up!, Designs © Zarna Gould

19 January 2010

Teacher Gifts Part 3

This was the set I made for Miss Kerry, Miss Kerry will be moving up to the "Sunshine" room with Charlotte this year so the transition to a new room will hopefully be a little easier if Charlotte knows one of her teachers.
This set is pretty self explanatory:


Oh, and I've been meaning to post this link from Allison:
Using Picasa to Perk Up Your Photos This is a great tip for people who don't have photoshop!
Stamps: A Beautiful Thing, Best Yet
Ink: Riding Hood Red, Old Olive
Cardstock: Washington Apple DSP, Bashful Blue, Riding Hood Red, Pumpkin Pie, Old Olive, Whisper White
Accessories: Blooms Die Cuts, Playground Designer Buttons, Linen Thread, Riding Hood Red Striped Grosgrain, Build-a-Brad
Punches: Scallop Edge Punch, Scallop, 1 3/8", 1 1/4", 1/2" Circle Punches

Images © Stampin' Up!, Designs © Zarna Gould

16 January 2010

Teacher Gifts Part 2

So, I totally meant to come back and show you the rest of the Teacher Gift sets that I made but I flaked so I'm sorry :) Anyway, enough excuses! Here is the 2nd set I made:I made this set for Miss Michelle (Or Mist Shell as Charlotte says...) Michelle is actually a friend of ours that I have known since I was about 10 and her kids were babies (those babies that I used to babysit now babysit for us how freaky old does that make me feel?!?) so it was really nice to have her in Charlotte's room last year, just the little things like when Charlotte was sick with high temps and I had to come in early to get her, she was sitting on the couch having cuddles with Michelle and seeing that instantly made me feel less guilty about sending Charlotte without realising she wasn't well. Michelle is on float this year so she doesn't know for certain yet if she'll be in Charlotte's room when Charlotte is there but it will be nice if she is...
Michelle has a really eclectic kind of taste, she has this shelf ("the shelf") in her house where she puts all the funky little bizarre kitschy things that she finds around the place that is always so cool to checkout, and I knew that the perfect DSP for her would be the new Kaleidoscope DSP with all the bright colours and butterflies!
I used the Beautiful Butterflies Bigz Die layered with the new Butterfly punch for the detail on top of the box. With all the sets I tried to keep the cards generic occasion cards so they could be used for whatever the teacher wants, but with each box I tried to include a little quote to let them know how important they have been to us, and I thought this quote from Flight of the Butterfly was perfect for this set and Michelle.
Now onto the cards, I made 2 of each design:


Stamps: Short & Sweet, Flight of the Butterfly
Ink: Lovely Lilac
Cardstock: Kaleidoscope DSP, Pixie Pink, Gable Green, Lovely Lilac, Whisper White
Accessories: Whisper White Taffeta, Pretty in Pink Taffeta, Fleurettes, Build-a-Brad, Sherbet Designer Buttons, Linen Thread
Punches: Butterfly Punch, Large & Small Oval Punches, Word Window Punch
Big Shot: Beautiful Butterflies Bigz Die, Divine Swirl Cuttlebug Folder

Images © Stampin' Up!, Designs © Zarna Gould

23 December 2009

Tutorial: Resizing Box Tutorials to make the box size you need

I wanted to make some mini pizza boxes for Teacher Gifts, but the SCS tutorial was the wrong size, so I quickly scanned the tutorial then made my own guide to make a box 9.5cm L x 9.5cm W x 2.5cm H.
I thought I'd share how to make a guide since I know that alot of box tutorials need to be resized because of the difference between US and Australian Card sizings.

Clear as mud? Leave a comment if you have any questions


Images © Stampin' Up!, Designs © Zarna Gould

22 December 2009

Teacher Gifts Part 1

I'm making a few of these sets for Charlotte's preschool teachers, each set is going to have 4 Cards (2 of each design) in a mini pizza box made using a different DSP to suit each teacher's personality. I've kept the cards as "For You" cards so that they can be used as gift tags, cards for birthday's or thank you's or just because cards.
The cards are 9x9cm and I have resized the SCS Mini Pizza Box tutorial to fit. Here are close ups of the box and cards:


I'll share the other sets later, and a tutorial on how to resize box tutorials to suit your project.
Stamps: One of a Kind, A Rose is A Rose
Ink: Pink Pirouette, Riding Hood Red, Kiwi Kiss
Cardstock: Bella Rose DSP, Riding Hood Red, Chocolate Chip, Pink Pirouette, Whisper White
Accessories: Riding Hood Red Striped Grosgrain, Flower Fusion Too, Pretties Kit, Linen Thread, Buttons Latte
Punches: Eyelet Border, Scallop Punches, Large & Small Oval Punches

Images © Stampin' Up!, Designs © Zarna Gould