31 August 2008

Get Free Wheelin'!

During September SU! are giving away free Stampin' Around Wheels when you purchase a Coordinating Set from the following list (The Free wheel is in Brackets):

  • Merry, Merry (All About Christmas)
  • Artfully Asian (Watercolour Vine)
  • Nursery Necessities (Nursery Letters)
  • Bodacious Bouquet (Bodacious) - Pictured above
  • Carte Postale (Leaves a la Carte)
  • Priceless (So Swirly)

That is a saving of $15.95!!! Email me for more info or to place your order today!


Images © Stampin' Up!

28 August 2008

Parkes Show part 1

As I mentioned before I had a display at the Parkes show this week, I thought I'd share some fun and excitement from the show. I have stacks of photos so I think I'll spread them out every few days so you don't get bored (that, and our internet has been capped and I could be here for that long trying to upload them hehe).

This first batch is of Charlotte, this was her first show and she loved it, she's very tired today though, I think we wore her out.
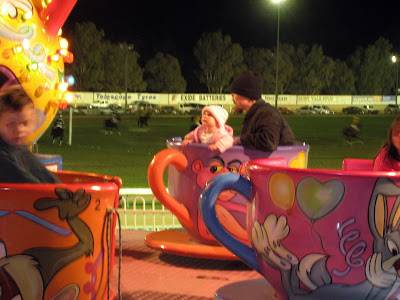
Here she is on her first show ride ever - the Teacups, she thought they were great and she ended up having no less than 4 rides on them! I took a few minutes away from the stall when Justin finished work at 12 (Our town gets a gazetted public holiday from noon onwards especially for the show on the Tuesday, it's fantastic because everything shuts and most of the town heads to the show - used to be great fun when we were at school getting out early to go, half the teachers would give up trying to teach on that day because everyone was too restless to work, lots of fun!) so I could take her on the ride while he took photos.I love that pic, how she's leaning forward makes it feel like she's going so fast!
Here's a photo of Justin on the ride with her on Wednesday night.
Once it got dark and all the show ride lights came on she couldn't take her eyes off them! I didn't get a photo (because I was in the line to ride)but she especially loved watching the zipper go round! Speaking of which I went on it twice! I don't think I've been on as many rides as I did this year in a long time! I was very depressed when I worked out that my first time on the zipper was about 10 years ago - makes me feel old! My friend James (the only person game enough to go on with me the first time - go James!) said to me after the ride "You didn't tell me you scream on these things", I thought I was being quite constrained with my screams because I didn't want him to think I was a chicken so imagine if I had let loose!!!
Her gran took her on as well but it was while I was working in my stand so I didn't get a photo.
Here is a pic of Charlotte watching the fireworks with Daddy:
It was her first time watching fireworks and I was so proud of her, she wasn't scared, in fact when they got really loud and we tried to cover her ears she would yell and pull our hands away. We were pretty much front and centre with most of the fireworks going off from about 200m away so it was as loud as it could get.

21 August 2008

Where I've been...

If you've been wondering why I haven't been around much lately it's because we bought our first house recently and moved in a little over a week ago, and because we thought it was smart at the time we moved in halfway through our renovations. I ran out of scheduled posts, but hope to get some more up next week after the Parkes Show. The pic is what my temporary stamping room looks like, and it's only set up at all because I have the stand at the Show, so I finish getting samples ready.
As you can see it doesn't really inspire creativity...
Anyway, keep stamping
Love

18 August 2008

Christmas is Coming!!

Don't get caught with imitation hand-made cards this Christmas, join our Christmas Card Club and make the real thing!
Between August & early December you will make 25 Christmas Cards & 5 Handmade gifts over 5 classes. (There is no obligation to attend all classes, but let’s just say there’s a little something extra for those who do!) The first class will be held on Saturday August 30th at 3.30pm. We have organised the hire of the Parkes AOG Church Hall* 7 Rees Avenue for the first class.
Classes will be $15 per class with $10 being redeemable against orders of $50 or more placed on the day.
All levels of experience from beginner to advanced are welcome to attend.
*The Christmas Card Club Classes are not a church event
RSVP by Thursday 28 August with your $15 to reserve your place
02 6862 2552 or zjgould@gmail.com


Images © Stampin' Up!, Designs © Zarna Gould

11 August 2008

Just a little tip to share & maybe a little offer too ;0)

This is a little tip that I learnt a little while ago and I have found it invaluable, so I thought I'd share in case anyone didn't already know it.

When you stamp a bold stamp and end up with an image like the above one, where it is all blotchy, it is the result of the manufacturing process where some rubber stamps end up with a film over the image and it becomes really obvious the bolder the image.
There are all sorts of solutions to fixing it out there, but the one that works for me every single time is to use an adhesive eraser over the stamp, I just give it a good scrub up and down then side to side and you can see the result:
An adhesive eraser is only $3.75 and it will save you so much frustration that I think it is a must have for every stamper.... so that is why with every purchase of Tart & Tangy from the Spring Mini I will be giving you an Adhesive eraser for FREE!!!
Just call me (02 6862 2552) or email zjgould@gmail.com to order.


Images © Stampin' Up!, Designs © Zarna Gould

07 August 2008

SCTL #1 - Out of the box


The challenge this week is to think outside the box, use something that is out of your comfort zone or make a card that isn't square etc.

This layout uses chipboard, and while I love it I really have trouble with how to cover or colour chipboard, with this layout I decided to try inking and then clear embossing, I think it looks good but they keep that just inked darkness and the colours don't quite match anymore. If anyone has any tips please let me know!
I also used a sketch from somewhere, think it may have been stuck?! but I'm not sure so if you own it let me know and I'll link you up

Ink: Wild Wasabi, Regal Rose, Basic Grey
Cardstock: Wild Wasabi, Regal Rose, Basic Grey
Accessories: Ginormous Pieces, Lots of Letters & Blooms and Blossoms On Board Chipboard, Corner Rounder Punch, Regal Rose 5/8" Grosgrain, Wild Wasabi Double Stitched Ribbon White Signo Gel Pen, Fire Round Rhinestone brads


Images © Stampin' Up!, Designs © Zarna Gould

Happy Birthday Lisa

I made these for Lisa's birthday week before last, I had to put off posting this as she had gone away and I wanted to make sure she got them before I posted them here. I am loving the Summer Picnic DSP and I know she is too so I decided to use some of the new Spring Mini goodies. I'm a bit of a hoarder of my "precious's", (but I'm trying to be better, what's the point in having them and not using them?) & so is she so I know she'll appreciate the Hodge Podge, Die Cuts, Rub ons & DSP.
I've double-layered the Real Red Grosgrain & Striped grograin to get this funky looking bow, it was really easy, I just took a little extra care to not get them tangled. (If you want to know how to make a really good knot check out this tutorial by Kristina Werner - ever since I started following her method I get a perfect knot every time)
This is a little gift card holder I made, I got the instructions from Dawn's Stampin' Thoughts, but changed it around a little to make the scallop punch hold it closed instead of having a belly band.
Here is a pic of the Gift Card Holder open.

Stamps: Tart & Tangy, Happy Everything
Ink: Earth Elements & Bold Brights SW Markers, Real Red, Old Olive
Cardstock: Bashful Blue, Real Red, Summer Picnic DSP
Accessories: Blooms Die-cuts, A Perfect Day Rubons, Real Red 5/8" Grosgrain, Real Red Striped Grosgrain, Real Red Gingham Ribbon, Styled Silver Hodge Podge, Scallop & 1 3/8" Circle Punch


Images © Stampin' Up!, Designs © Zarna Gould

06 August 2008

Berry Bliss Gift Set


My favourite DSP!!! This was part of my mum's birthday present, a gift bag (SU! sell them but this one is one i got from a shop and just covered the logo with some cardstock) and a pop-top can full of little candles.
Cardstock: Close to Cocoa, Purely Pomegranate, Berry Bliss DSP, Whisper White, Pretty in Pink
Ink: Purely Pomegranate
Stamps: Boho Backgrounds, Riviting (Retired but a good substitute is Circle of Friendship)
Accessories: Purely Pomegranate DS ribbon, Jumbo Eyelets, Urban West Rubons

05 August 2008

So Shelli Creative Challenge #1 - Let's Celebrate Invitation

Shelli from SU! (I mean THE Shelli, who is Stampin' Up! lol) has started a blog called So Shelli & she has a Creative Challenge that she will be running once a month, the challenge for August is "Celebrate" (the theme for the US convention that just finished) and an idea popped into my head straight away so I had to play tonight.

I used some Real Red Gingham ribbon (don't you think Tart & Tangy and gingham ribbon are a match made in heaven? reminds me of homemade jam and picnics) I started this as a possible birthday invitation for Charlotte's birthday party (Can you believe my baby girl will be 1 in just over 2 months???), but I think that I want to make it more girly, this would be better for an older child or Kitchen Tea party maybe? I might have to try something with Berry Bliss & Pretty Princess, what do you think? Anyway here is the back of the invitation (or the front depending which way round you want it):
I've used the Summer Picnic DSP (again! are you sick of it yet? I'm not! hehe) & one of the Blooms die-cuts. I made the invitation "Long Notes" size, so it fits in a business size envelope (1/3rd of an A4)

Stamps: Tart & Tangy, Family Phrases, Family Favourites, Please Come
Ink: Real Read, Bashful Blue, Old Olive & Bold Brights SW Markers
Cardstock: Real Red, Bashful Blue, Summer Picnic DSP, Very Vanilla
Accessories: Blooms Diecuts, 1 1/4" & 1 3/8" Circle Punch, Real Red Gingham Ribbon, Fire Square Rhinestone Brads


Images © Stampin' Up!, Designs © Zarna Gould

01 August 2008

Cherish & Happiness is You & Me - Double Page Wedding

These are the 2nd & 3rd pages for our wedding album, and... they are stamp free! The flowers are actually punched out of the black and then the Coloured card is adhered behind the negative left from the punch.
Cardstock: Basic Black, Pixie Pink, Gable Green
Accessories: Cherished Memories Rubons, Rhinestone Brads (Fire & Ice), 5-Petal Punch, Spring Bouquet Punch, Signo White Gel Pen for Journalling