31 May 2009

What you need to know for May

***Sticky Post Please Scroll Down for New Entries***
  • $150 Starter Kit - Interested in starting a scrapbooking focused business? Find out all the information here.
  • Thinking about taking advantage of the Starter kit promo? Check out the Introduction to SU! video on the SU! website.
  • Buy 3 get 1 FREE - Build up your DSP collection with this fantastic offer. For details see this post here.
  • Terrific Techniques May Class - "Embossing Excellence" 3.30pm 30/5/09 $25 for 3 cards using various Heat Embossing techniques.
  • Social Crop Night - Bring along your own craft project and enjoy some company while you create, 7pm 12/5/09 $5 includes a light supper and access to my equipment & stamp sets (consumables may cost extra)
  • Sign up for my newsletter - Newsletter subscribers get exclusive project sheets & a product spotlight every month straight to their inbox.

Images © Stampin' Up!, Designs © Zarna Gould

Z-fold Invitation

Sick of these sets yet? I've still got a few more to share but I might take a break from them for a few days and share something different.
This set is a Z-fold invitation (held shut by a belly band), Save the Date Card & Place Card. I got the original inspiration from this beautiful card by the very talented Teneale Williams, after I finished though, I realised that the colours were a very good match for my Mum & Dad's wedding (back in early 1980 so Brown suits for the guys and blush coloured flowers & dresses for the girls). I wish I'd realised earlier or I would have made it "for them"...
Stamps: It's Beautiful, A Beautiful Thing, Finest Flourish
Ink: Chocolate Chip, Versamark
Cardstock: Blush Blossom, Chocolate Chip
Accessories: Very Vanilla 5/8" Grosgrain, Chocolate Chip 5/8" Grosgrain, Clear EDP


Images © Stampin' Up!, Designs © Zarna Gould

28 May 2009

Tentfold Invitation

Another set from my portfolio, this one includes a Tentfold Invitation, Place Card & Thank You Note. I designed this set based on an invitation I'm currently working on, so obviously I've had to change the names & colours, but the frangipani theme is the same.
Stamps: Stamp It Frangipani, Sincere Salutations
Ink: Pretty in Pink, Barely Banana
Cardstock: Pretty in Pink, Barely Banana, Confetti Cream
Accessories: Soft Subtles Brads, Crimper, Jumbo Eyelets


Images © Stamp It Australia, Stampin' Up!, Designs © Zarna Gould

25 May 2009

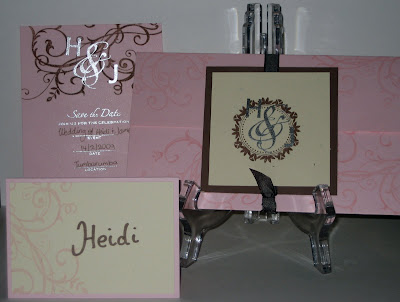
Trifold Invitation

Another set for my invitation portfolio. This set includes a Trifold Invitation, Place Card & Save the Date Card. This set is using the colour scheme from Justin's cousins wedding we went to earlier this year, they had gorgeous pale pink bridesmaid dresses with brown trim.
I would like to say with this set that I'm only claiming to be a cardmaker not a calligrapher, the bride & groom would either need to organise their own calligraphy or get me to print them off the computer, but I wanted to show that there is the handwritten option available.
Stamps: Together Forever, Baroque Motifs, Short Order Alphabet, Please Come
Ink: Versamark, Close to Cocoa, Pink Pirouette
Cardstock: Pink Pirouette, Close to Cocoa, Very Vanilla
Accessories: Silver EDP, Chocolate Chip Taffeta


Images © Stampin' Up!, Designs © Zarna Gould

22 May 2009

Pocket Invitation

I was going to wait to share these until later, but since I've been spending almost every spare stamping second on these or other projects that really can't be shown until a certain date I decided it would be better to start sharing these now, rather than let my blog go neglected.
I will be an exhibitor at a bridal fair next month for my side business and I have been building up my portfolio (one of those things I've been meaning to do for months now, nothing like a deadline to get you moving, right?) so what I have done for most of them is taken the Colour Scheme's from recent friend & family weddings and designed an invitation & matching stationery set as if I were designing it for them.
This set includes a pocket invitation, RSVP postcard & reception place card.
Stamps: Baroque Motifs, Baroque Border
Ink: Elegant Eggplant, Lavender Lace
Cardstock: Elegant Eggplant, Lavender Lace, Going Grey
Accessories: Elegant Eggplant 1/4" Grosgrain, Wide Oval Punch, Silver Brads, Corner Rounder Punch


Images © Stampin' Up!, Designs © Zarna Gould

19 May 2009

Card Photography

I'm not pretending to be a professional photographer or anything but since I still don't have any new cards that I can share yet I thought I'd share quickly on how I take photos of my cards.
There are a few places that people seem to go wrong, and if you look back at my older cards you'll notice I made the same mistakes and someone told me how to fix them, so I thought I'd pass it on.Backgrounds
Noone wants to look at pictures of your messy desk (unless there's new catalogue spoilers etc to be seen in the background lol) so I always try to find somewhere clean but plain to take a photo, some people have a nice bookcase etc to give a clean background without distracting from the card. Clear, dust free surfaces are hard to find in a house with a toddler who trashes things and a husband that "doesn't know" (ha! likely story...) where anything lives, so I go for the lightbox approach. Lightboxes are really expensive but you can get the same look without spending a cent.
In the photo above you can see my "light box" I use 2 backing sheets from DSP Packs and prop them up like you can see in the pic, 1 for the base and 1 for the background. If I'm doing a layout I put the 2 sheets side by side for the background and use a clean piece of grid paper for the base. I have also seen people use a coordinating sheet of DSP as the background which looks fantastic as well.
Some people use daylight or OTT lamps to get the colours right, but I find with a few photoshop tricks you don't necessarily need one - more on that later.
Camera Settings
I set the camera on Macro, most entry level point and shoot digital camera's have a macro setting these days (in case you aren't sure which button it is, here is a photo, they look similar on all camera brands). If you use the macro settings you are telling the camera that you are trying to take a close photo with lots of detail so the camera focuses better and seems to pick up a lot more of the detail. It also seems to not make the flash as harsh (at least on my camera), not really sure on the technicalities but i can take a photo with the flash and totally wash it out, then switch to macro and from the same distance have the colours and detail come out perfectly.
Also, don't be afraid to back off and get more background in the frame than what you want, you can easily crop it out later.
Photoshop
Using the flash will affect the colours slightly even with the macro setting, I have a hand-me-down copy of photoshop CS2 that I use but most photo editing software would have similar options. Anyway my trick (about the only thing I know how to do apart from crop a photo) is to go into the Image menue... Adjustments... Auto Levels, then Auto Contrast and Auto Colour. Sometimes you might need to undo and leave out 1 of the steps but I find that these 3 normally make a huge improvement to the colour of my photo's.
If you don't have access to photoshop or similar you may find that you need to position your "lightbox" in sunlight to get enough natural light to go without the flash.

Images © Stampin' Up!, Designs © Zarna Gould


16 May 2009

Nick & Carmen's wedding

Remember last month when I made the wedding card for my brother-in-law and his (now) wife's wedding? Well anyway, our gift for the wedding was their invitations so when I went to put the card in the envelope the day before the wedding it looked a bit plain without being attached to a gift so I decided to dress up the envelope a little. It took less than 5 minutes but it makes it look so much more than just a card.
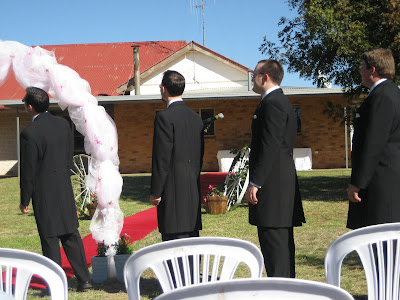
I also thought I'd put in some pic's from the big day. The got married in the garden of a friends farm and it was a beautiful day!
I love this one of the guys, the car has just pulled up and you can see Nick practically breaking his neck trying to see Carmen in her dress. (PS there were actually people at the wedding just noone on our side wanted to sit up the front lol) They also did things slightly differently by having the red carpet come in from in front of the "alter" instead of coming through the crowd.Don't you think she looked like a princess? I know you're supposed to say that about every bride but if you'd asked me as a little girl to describe a princess dress it would be this one, the poor dress lost a layer of tule before the end of the reception, but they were hoping to get that fixed when it gets dry cleaned. Justin & the 'other' Mrs Gould, Carmen's best friend used to be married to a distant relative of Justin & Nick's (their dad's were 2nd or 3rd cousins or something lol) so when they announced the bridal party at the reception they decided to forgo using surnames to avoid having to explain to people the whole "Justin & Tammy Gould" aren't really a couple lol. This was the only half decent photo I got of Charlotte on the day, as you can see she was very busy that day running everywhere. I wish I'd gotten a better pic because the little top has sewn on little necklaces on it and looks absolutely adorable.
Stamps: Forever Flowers wheel, Together Forever
Ink: Pretty in Pink
Accessories: Whisper White envelope, Pretty in Pink Taffeta


Images © Stampin' Up!, Designs © Zarna Gould

14 May 2009

Wonderful Mother take 2

This was the card I made for my Mum, it's basically the same sketch as the other card I made I just flipped it and stamped instead of using the sticky cuts & glitter.
Stamps: Eastern Blooms, Wonderful Favourites
Ink:Pacific Point, Chocolate Chip
Cardstock: Good Morning Sunshine DSP, Kiwi Kiss
Accessories: Flower Fusion Too, Button Bouquet, Eyelet Border Punch, Ice Rhinestone Brads


Images © Stampin' Up!, Designs © Zarna Gould

12 May 2009

Wonderful Mother

This was the mothers day card I came up with for Justin's mum. It's not a heaps traditional mothers day card but this pattern just jumped out at me yelling use me use me lol.
Stamps: Wonderful Favourites
Ink:Pacific Point, Kiwi Kiss
Cardstock: Kiwi Kiss, Summer Sun, Good Morning Sunshine DSP
Accessories: Kiwi Kiss DS Ribbon, Filigree Designer Brads, Button Bouquet, Linen Thread, Sweet Sticky Cuts, Cosmo Fine Glitter


Images © Stampin' Up!, Designs © Zarna Gould

10 May 2009

Brag alert!

Ok, so before you accuse me of losing all my talent & or mojo I want to tell you that this is a card Charlotte made at playgroup.
Anyway, I've been making heaps lately, but nothing I can show you right now (don't you hate when people say that???) and my scheduled posts have run out, so to keep up with my new years resolution of blogging every few days I thought I'd share this one with you.
I felt weird helping her make me a mothers day card so we made one for my mum instead. Someone had got some cardstock and cut love hearts out of the front for the kids to colour and stick stuff on. Charlotte had fun with the glue, it ended up all over her.
And we decorated the inside and the back too:
She "wrote" in the card (ie me holding her hand holding the crayon) and I was telling her what we were writing as we were writing it and when I said "love" (for the heart) she leaned over and kissed the page so I had to add the 2 little kisses at the end, and I'll make sure to tell my mum that they are real kisses lol.
I'm actually pretty impressed at how simple these were and how much she loved making it so we made one for Justin's mum & nana too, which I'll share if I don't get more stamping done soon lol.

08 May 2009

CASE-ing a CASE

Another card from minicon, this time I made one for my Sister-in-law-in-law (brother in law's girlfriend) for her birthday. There's a funny story behind this card, Lisa made a beautiful card that was a CASE of a card using this stamp set and the Crayon Resist technique by Dawn Griffith, I loved her card so much that I CASE'd it myself using a different Colour combination and then she loved this colour combo so much that she decided to CASE it lol.
Stamps: Fifth Avenue Floral, On Your Birthday
Ink: Riding Hood Red, Kiwi Kiss, Pink Pirouette
Cardstock: Whisper White, Kiwi Kiss, Riding Hood Red
Accessories: Riding Hood Red Taffeta, Button Bouquet, White Crayon (kids Crayola), Sponge Daubers, Cotton Wool, Dazzling Diamonds, 2-Way Glue


Images © Stampin' Up!, Designs © Zarna Gould

07 May 2009

Let's Celebrate!

This is another card from our little "minicon" and the card I made for my mum's birthday. I have watercoloured the flowers using Markers & Aquapainters, which I really do think is my favourite watercolouring method. I actually coloured the image twice and cut the flowers out to pop them up against the pot.
Stamps: On Your Birthday, Bloomin' With Happiness, En Francais
Ink: Stazon, Versamark
Watercolouring: Markers with Aquapainters; Creamy Caramel, Really Rust, Certainly Celery, Old Olive, Lavender Lace, Pale Plum, Elegant Eggplant
Cardstock: Pale Plum, Elegant Eggplant
Accessories: Dimensionals, Paper Snips, Styled Silver Hodgepodge, Elegant Eggplant 1/4" Grosgrain, White EDP


Images © Stampin' Up!, Designs © Zarna Gould

06 May 2009

Flower Pot


I have been loving the Flower Pot Cards everywhere lately and decided to have a go while on my stamping escape at Lisa's. Since I didn't really want to cut out that many flowers I thought it would be the perfect chance to use some of the blooms Die-cuts I have been hording since the Spring Mini (thank goodness they bought them back). I stamped off once in Bashful Blue to stamp the small flower from Petal Pizazz behind the sentiment.
I didn't really follow a tutorial, and just kind of winged it but I'm sure you could find something on splitcoast if you want to do it properly.
Stamps: Best Yet, Petal Pizazz
Ink: Bashful Blue, Old Olive
Cardstock: Chocolate Chip, Bashful Blue
Accessories: Blooms Die-cuts, Old Olive & Real Red 1/4" Grosgrain, Old Olive 5/8" Grosgrain, Styled Silver Hodgepodge


Images © Stampin' Up!, Designs © Zarna Gould

05 May 2009

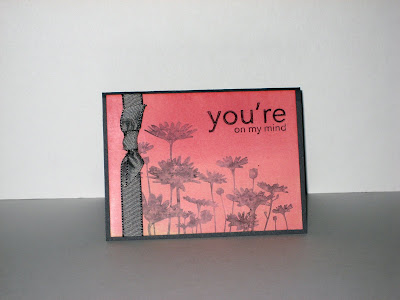
You're on my Mind

Another card using new products from our "Minicon" weekend in Dubbo. I tried a little "Zindorf-ing"* for this card, brayering on a million colours to create a sunset feel. This card is a little tiny card made out of a quarter of a piece of cardstock.
*CASE-ing Michelle Zindorf's style
Stamps: Upsy Daisy
Ink: Basic Grey, So Saffron, Apricot Appeal, Pretty in Pink, Regal Rose, Cameo Coral, Ruby Red
Cardstock: Basic Grey, Glossy White
Accessories: Basic Grey Taffeta


Images © Stampin' Up!, Designs © Zarna Gould

04 May 2009

Just Because I Care

Since noone from her team could make it to convention this year Lisa organised a "Mini Convention" (Minicon lol) for us, so I spent ANZAC weekend at Lisa's playing with all the brand new stamp sets that I don't own (...yet lol) I got a massive 6 cards made which I will share with you over the next few days.
This was a set & technique I have wanted to try ever since I saw it in the US. Instead of adding colour to the rubber with ink pads or markers, you use Sponge Daubers to apply the colour.
Stamps: Inspired by Nature, Best Yet
Ink: So Saffron, Summer Sun, Really Rust, Bravo Burgundy, Chocolate Chip, Old Olive, Garden Green
Cardstock: Chocolate Chip, Old Olive, Whisper White
Accessories: Sponge Daubers, Hemp Twine, Button Bouquet


Images © Stampin' Up!, Designs © Zarna Gould

02 May 2009

Just My Sketches - Playing House

Ok, before everyone goes all feminist on me please know that this layout is meant to be a bit tongue in cheek:Today's the day for another Just My Sketches reveal and this is my take on Deanne's sketch for the month of May. I've included the sketch below and you'll be able to see that I used a bit *read alot* of creative license on this sketch layout, but that's what sketches are all about, something to use as a jumping point to get those creative juices flowing!

The layout is about Charlotte's obsession with "cleaning" whenever she gets her hands on a cloth, one day she was wearing her church clothes and got her hands on a tea towel to start scrubbing the kitchen table and just the way she was dressed in the little halter neck dress with the cute little shiny dress shoes it reminded me of the cliche'd 50's housewife and the phrase "A good wife cleans in heels and pearls" popped into my head like something from that 'The Good Wifes Guide' that does the email circuit every now and then.

I made the photos Sepia to give them a vintage look and used some of that yummy Raspberry Tart DSP to finish off the page.
The little square "doiley" was made using the Eyelet Border punch. There is a really good tutorial here that shows you how make them.

Anyway, as always don't forget to check out the rest of the DT's designs over at Deanne's blog and if you want to play along here's a copy of her sketch (To celebrate world scrapbooking day there's a little something extra in it for anyone who links to their creation over at Just My Sketches):

Stamps: Short Order Alphabet, Calender Alphabet
Ink: Rose Red
Cardstock: Raspberry Tart DSP, Cameo Coral, Kiwi Kiss
Accessories: Filigree Designer Brads, Sticky Cuts Letters, Supernova Fine Glitter, Eyelet Border Punch


Images © Stampin' Up!, Designs © Zarna Gould

A little plug for my good friend Nat

My friend Natalie has an online business called "Enjoyem" selling all sorts of cute little bits and pieces for Babies and Small Children, among my favourite things that she sells are the Nappy Cakes (they can be made up with singlets and other bits and pieces if the mother to be isn't using cloth) and the huge big Muslin Wraps which are fantastic for keeping little wriggle worms tucked up nice and warm during winter, (seriously anything less than about 1.2m wide is useless!).
Anyway, next time you're after a baby gift make sure you go and check out what Nat has to offer, you couldn't be dealing with a nicer person!


01 May 2009

Start your own business for $150!

In celebration of National Scrapbooking Month Stampin' Up! are helping scrapbookers start their own business for just $150!!
For $150 you will receive all the training and business supplies that you need to get your business up and running, plus you will get:

  • Schoolbook Serif Alphabet (RRP $77.95)
  • Petal Party Simply Scrappin' Kit (RRP $36.95)
  • Earth Elements 12x12" Textured Cardstock (RRP $21.95)
  • Pumpkin Pie Classic Inkpad (RRP $11.95)
  • Craft & Rubber Scissors (RRP $37.95)
With the exception of the Craft & Rubber Scissors any of these items can be substituted for like items of equivalent value if you already own or would prefer something else.

Contact me on zjgould@gmail.com or 0418 650 294 if you want more information.

Images © Stampin' Up!, Designs © Zarna Gould

Buy 3 packs of Designer Series Paper and get 1 FREE!!

This month at Stampin' Up! we are offering you a great promotion to help build up your patterned paper collection.
When you buy 3 of our DSP packs* you can get a 4th of your choice for FREE!! There is no limit to how many you can get free, for every 3 you buy you get 1 free it really is that easy!
*Excludes the Patterns Collection & Specialty Designer Series Paper

Images © Stampin' Up!, Designs © Zarna Gould